Installing Sod on a Slope (The Right Way)
The staking and staggering techniques that keep sod from sliding on hillsides.
Installing sod on a slope presents unique challenges compared to laying it on flat ground. Gravity can cause freshly laid sod to shift or slide before its roots establish, undermining your efforts and investment. Understanding the correct techniques for securing sod on inclines is crucial for achieving a stable, healthy lawn. This guide will walk you through the essential steps to ensure your sod adheres properly and thrives on sloped terrain, preventing common pitfalls.
Assess Your Slope and Prepare the Site
Before laying any sod, accurately assess the steepness of your slope. Gentle slopes, generally those with a gradient of less than 3:1 (a 1-foot rise over 3 feet of run), may require less intensive securing methods. Steeper slopes, however, demand more robust techniques to prevent movement. Consider the direction of water runoff and erosion potential, as these factors will influence your preparation strategy.
Site preparation is paramount for successful sod installation on any terrain, especially slopes. Clear the area of all debris, weeds, and existing vegetation. Grade the slope smoothly, ensuring a consistent surface without dips or bumps where water can collect. Amend the soil with organic matter to improve drainage and nutrient content, aiming for a soil depth of 4 to 6 inches, which provides a healthy foundation for the sod roots to penetrate deeply.
Strategic Sod Placement: Horizontal Rows are Key
When installing sod on a slope, always lay the sod strips horizontally across the incline, rather than vertically. This method creates mini-terraces that help slow down water runoff and reduce the risk of erosion. Starting at the bottom of the slope and working your way up is generally recommended. This allows you to stand on previously laid sod, minimizing disruption to the soil and newly placed strips below.
Ensure each sod strip is butted tightly against the previous one, without overlapping or leaving gaps. Staggering the seams, much like laying bricks, is critical for stability. This technique distributes pressure evenly and prevents continuous lines that could become weak points for water infiltration and erosion. Avoid walking directly on newly laid sod as much as possible; use boards if necessary to distribute your weight.
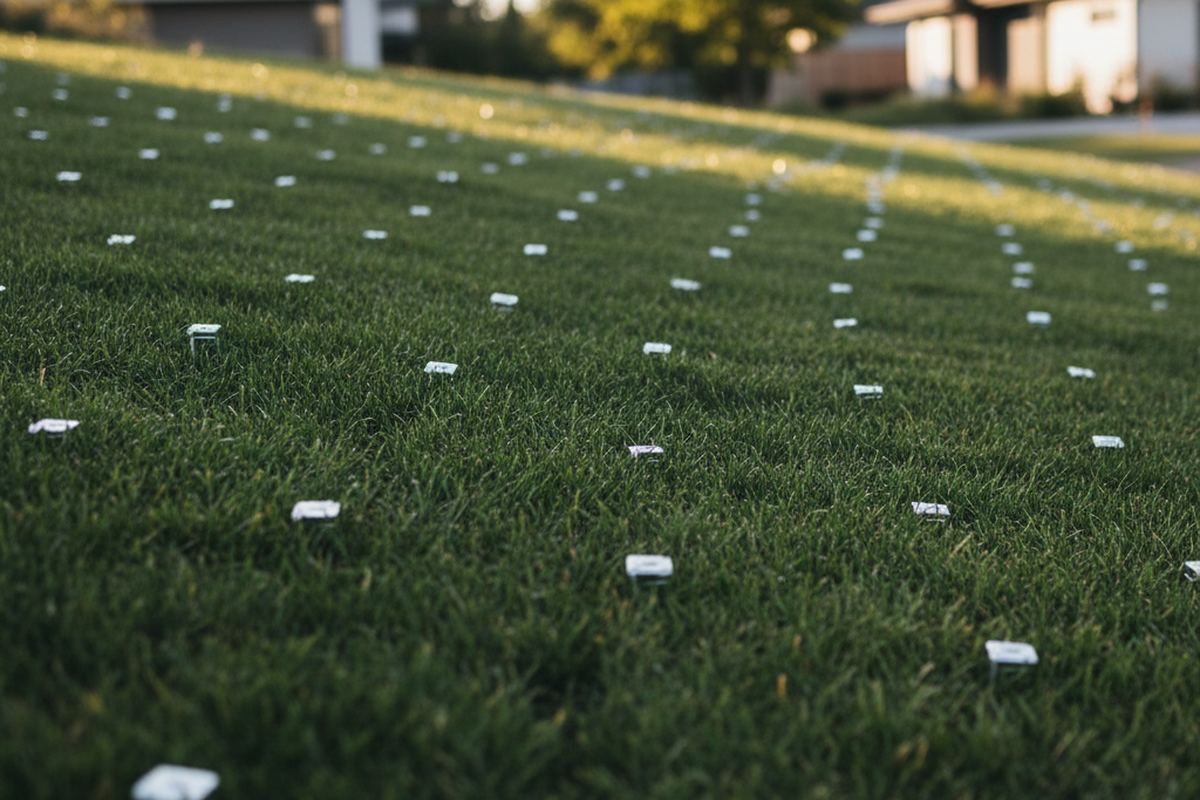
Secure Your Sod with Biodegradable Stakes
To prevent sod from sliding down the slope before it roots, securing it with biodegradable stakes is essential. These stakes, typically made from wood or corn-based plastics, will decompose over time, eliminating the need for removal. The number of stakes required depends on the steepness of the slope; a steeper incline will necessitate more stakes to hold the sod firmly in place.
For moderate slopes (e.g., 2:1 to 3:1), place stakes every 1 to 2 feet along the seams and through the center of each sod strip. On very steep slopes (steeper than 2:1), you might need to place stakes every 6 to 12 inches. Drive the stakes flush with the sod surface to prevent them from becoming tripping hazards or interfering with mowing. This comprehensive staking ensures the sod remains stable during the critical rooting period.
Estimate sod pallets, rolls, and total install cost for your yard — with delivery and prep budget.
Open the Sod CalculatorOptimize Watering for Slope Stability
Proper watering is crucial for sod establishment, but on slopes, it requires a delicate touch. Overwatering can lead to runoff, washing away soil and even dislodging sod. Underwatering, conversely, will prevent roots from developing. The goal is to keep the sod and the underlying soil consistently moist, but not saturated, for the first two to three weeks.
Water frequently with short bursts rather than one long, heavy session. For example, water for 10-15 minutes, three to four times a day, especially during warmer weather. This allows the water to penetrate the sod and soil without causing excessive runoff. Monitor the sod closely; if it appears dry or begins to turn grayish-blue, increase watering frequency. Reduce watering frequency as the sod establishes, transitioning to deeper, less frequent watering.
Post-Installation Care and Maintenance
After installation, avoid heavy foot traffic on the newly laid sod for at least two to four weeks. This allows the roots to firmly knit with the underlying soil without disruption. Begin mowing only after the sod has firmly rooted and grown to a height of about 3 inches. Set your mower to its highest setting for the first few cuts, never removing more than one-third of the blade height at a time. This promotes deeper root growth and overall turf health.
Fertilize your new sod approximately four to six weeks after installation with a starter fertilizer that is rich in phosphorus, which encourages root development. Follow the product's instructions carefully. Continue to monitor for any signs of erosion or sod displacement, especially after heavy rains. Address any issues promptly by re-staking or patching small areas if necessary to maintain the integrity of your new lawn.
Consider Erosion Control Measures
For very steep slopes or areas prone to significant water runoff, additional erosion control measures may be beneficial. Erosion control blankets or netting can be laid over the soil before sod installation. These products provide an extra layer of stability, holding both the soil and the sod in place until the roots are fully established. They are typically made from biodegradable materials like straw or coconut fiber.
Another long-term strategy for erosion control on slopes is incorporating ground cover plants or shrubs at the top or base of the slope. Their root systems can help stabilize the soil and slow down water flow. In extreme cases, terracing or retaining walls might be necessary to create more level planting areas and effectively manage water runoff, complementing your sod installation efforts.
The bottom line
Successfully installing sod on a slope requires careful planning, precise execution, and consistent aftercare. By following these methods for preparation, strategic placement, staking, and watering, you can establish a robust and attractive lawn on challenging inclines. Patience during the rooting phase and diligent maintenance will ensure your new sod thrives for years to come.
Get more guidance like this in your inbox
Weekly emergency-fund tactics, milestone checklists, and the next article — delivered free.
Run your own number
Get a personalized emergency fund target based on your income, expenses, and job stability.
Open the calculator