Tile Waste Factor by Pattern (Straight vs Diagonal vs Herringbone)
The waste percentage you need to add for each install pattern, backed by pro tile setter data.
When planning a tiling project, accurately estimating the amount of material needed is crucial for staying within budget and avoiding costly delays. Beyond simply measuring the square footage of the area, you must account for tile waste. This additional material covers cuts, breakage, and future repairs. The specific pattern you choose for your tile layout significantly influences this waste factor, with more complex designs requiring a greater buffer.
Understanding the Standard Waste Factor
A general rule of thumb for standard, straightforward tiling projects is to add a 10% waste factor to your total square footage. This percentage typically accommodates minor cutting errors, a few broken tiles, and the necessary cuts around obstacles like doorways or fixtures. This baseline is suitable for simple grid patterns where most tiles are installed whole or with minimal trimming.
However, relying solely on this 10% figure can lead to shortages or overspending, especially for intricate layouts. Professional tile setters often adjust this percentage based on the tile type, room geometry, and, most importantly, the chosen pattern. Understanding these nuances helps in making a precise material order from the outset.
Straight Lay: The Most Efficient Pattern
The straight lay, or stack bond, is the simplest and most material-efficient tile pattern. Tiles are installed in a grid, with grout lines running parallel and perpendicular to the walls. This pattern minimizes waste because most cuts are straight and often only needed at the perimeter of the room. For a typical square or rectangular room with minimal irregularities, a 5-7% waste factor is often sufficient.
Consider a 100 square foot room. With a 5% waste factor, you would order 105 square feet of tile. This pattern is ideal for large format tiles where visible grout lines are less emphasized, or for achieving a clean, modern aesthetic. Always measure the room's perimeter accurately to account for necessary edge cuts.
Diagonal Lay: Increased Cuts and Waste
A diagonal lay involves installing tiles at a 45-degree angle to the walls, creating a visually expansive and dynamic effect. While aesthetically pleasing, this pattern significantly increases the number of cuts required. Every tile touching a wall or obstacle will need two angled cuts, leading to more material loss than a straight lay.
For diagonal patterns, a waste factor of 12-15% is generally recommended. For a 100 square foot area, this translates to ordering 112-115 square feet of tile. Irregularly shaped rooms or those with many corners will push this percentage higher due to the increased complexity of edge cuts. This pattern is particularly popular for smaller spaces to create the illusion of greater width or length.
Calculate how many tiles you need — with pattern waste, thinset, and grout coverage included.
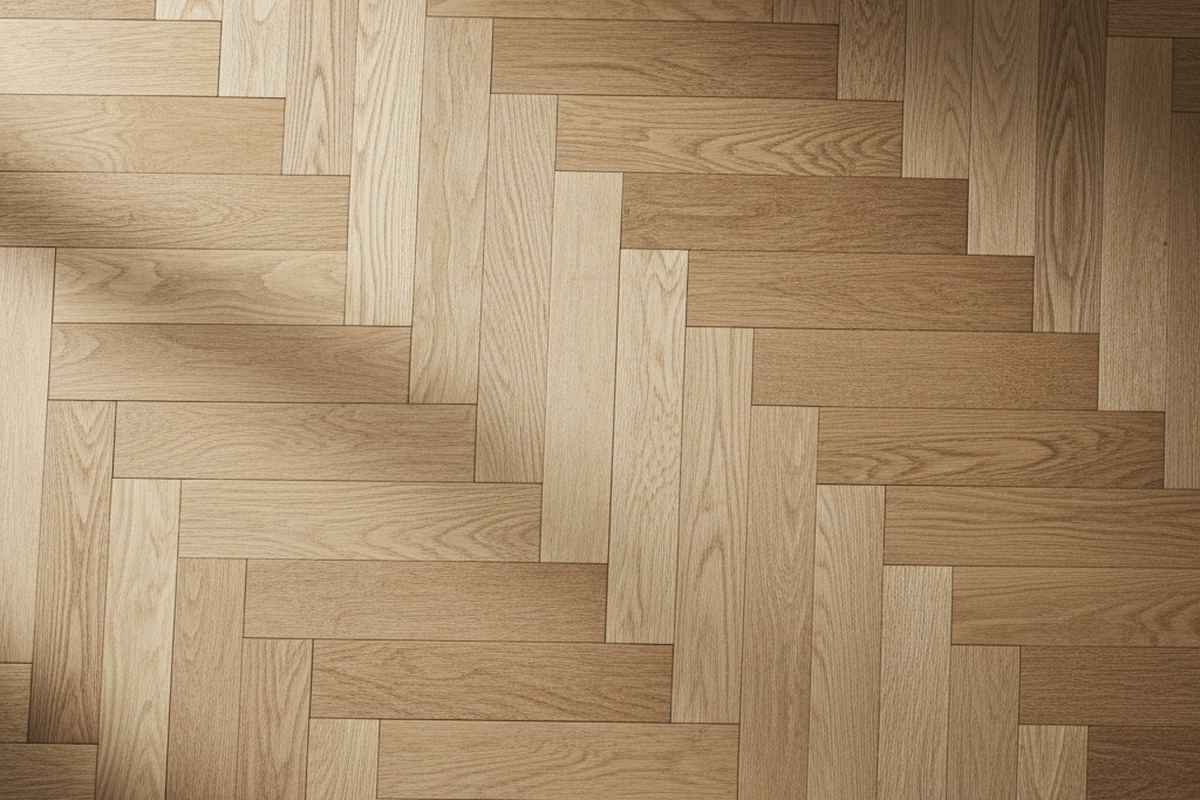
Open the Tile CalculatorHerringbone Pattern: Highest Waste Factor
The herringbone pattern, characterized by rectangular tiles laid in a zigzag formation, offers a sophisticated and classic look. However, it is by far the most material-intensive pattern. Each tile in a herringbone layout requires precise cuts at a 45-degree angle to fit together correctly, resulting in substantial material loss around the perimeter and within the pattern itself.
Expect a waste factor of 15-20% for herringbone. In a 100 square foot room, you would need to order 115-120 square feet of tile. This higher percentage is especially critical for smaller tiles or those with a high breakage rate. Always double-check your measurements and consider purchasing an extra box of tile to be safe.
Offset/Brick Pattern: A Moderate Approach
The offset, or brick pattern, involves staggering tiles so that the grout lines of one row align with the center of the tiles in the adjacent row. This pattern is a popular choice for its classic appeal and ability to mask minor imperfections in wall or floor flatness. It requires more cutting than a straight lay but less than diagonal or herringbone.
For an offset pattern, a waste factor of 10-12% is typically adequate. The cuts are primarily straight, but the offset nature means more tiles will require trimming at the edges compared to a simple grid. This pattern works well with rectangular tiles and can add visual interest without excessive material waste.
Factors Influencing Your Final Calculation
Beyond the pattern, several other elements impact your waste factor. The size and shape of the tile are significant; smaller tiles generally have less waste per cut, but very large format tiles can be prone to breakage during handling or cutting. The room's geometry, including irregular shapes, numerous corners, or built-in obstructions, will also increase the necessary waste percentage.
Additionally, your experience level plays a role. DIYers may want to add a slightly higher buffer (e.g., an extra 2-3%) to account for potential learning curve mistakes. For expensive or hard-to-find tiles, it is always prudent to err on the side of caution and order a bit more. Having spare tiles for future repairs can also save significant hassle.
Final Considerations for Ordering
When calculating your tile order, remember that buying in full boxes is often necessary. Round up your total calculated square footage (including waste) to the nearest full box increment. This ensures you have enough material without ending up with partial boxes that are difficult to return.
Always inspect tiles upon delivery for any damage or inconsistencies. Mismatched dye lots can be an issue, so ensure all boxes belong to the same lot number if possible. Keeping a few extra tiles from the same dye lot is invaluable for future repairs, as finding a perfect match years later can be challenging.
The bottom line
Accurately calculating your tile needs, including the appropriate waste factor, is a critical step for a successful project. By understanding how different patterns influence material requirements, you can make informed decisions and avoid common pitfalls. Factor in your chosen pattern, room complexity, and tile characteristics to ensure you have just the right amount of tile on hand.
Get more guidance like this in your inbox
Weekly emergency-fund tactics, milestone checklists, and the next article — delivered free.
Run your own number
Get a personalized emergency fund target based on your income, expenses, and job stability.
Open the calculator